Friday, September 30, 2016

September Fan Projects

It's time to share the September Fan Projects!

Here are some Travel projects. This was challenge theme for September.

Travel Layout by Leyna Su


Travel Journal by Karen Blevins
(Many more pages on the FB Galleria Page)


Travel Decor project by Sonja Bakonyl


Card by Melissa De Monic


Invitation by Janeen DeFon


Layout by Julie Gift


Back to School Frame by Jennifer Lyons


Here are a few Halloween Projects:

Gift Box by Melissa Miranda


Halloween Treat Bag by Tammy Bour
(the white areas even glow in the dark!)


Sweet Card by Beth Fiscus
Stop by Beth's Blog!


Halloween Layouts by Cyndi Reilly


Halloween Explosion Box by Pamela Bykerk-Haywood
(More projects on the Galleria FB Page)


I spotted all these projects on the Miss Kate Galleria Facebook Page.
If you are not a member head on over and join in the fun!

Sunday, September 25, 2016

Yay!!! Halloween Time It's a Monster Mash


Hey everyone its my turn to share with you my Project. So guys it's here the End
 of September Cooler Weather and a lot of creating so put your thinking caps on you
 Know what that means HOLIDAY SEASON is Here YAY!!!!!. We gonna be Family gathering, Kitchen Cooking, Baking,
Food eating
 and Card creating fools Lol.  So this is my 1st Halloween Card of 2016 
 I used 2 files Frankenstein Head and Monster Mash Title to create my Card. hope
 you enjoy don't forget to grab your FREEBIE for the day. For More Details Click on The Click Below or head to spyrorocks346 on YouTube
 and Don't forget to Subscribe for upcoming Project and videos. 
Smoochez Gloria


FRONT


INSIDE


Saturday, September 24, 2016

Happy Birthday Trio


Hello everyone!  It’s Kim from KatydidCards.  This is my first post as a Miss Kate Cuttables Design Team member and I’m just so happy to be here with you. 

First order of business…I want to remind you to get the freebie today (and every day).  Just click on this link.  I’ll wait here for you if you want to do that now…just don’t forget to come back as I have something fun to share with you!

Here’s my project, made using the Happy Birthday Title.  I had a bit fun with it, though, turning it into a card, tag and gift bag set.   I saw a video on making a stacked card front with a die cut and I was sure I could use one of the many Miss Kate's titles to do something similar...even better since it's so much easier than using die cuts.

Let me show you the card first and then I'll tell you a bit about how it came together.


I sized the title for the card front and then created a quarter inch offset of just the word Birthday.  Then I centered the offset in a 4" x 5 1/2" rectangle and ran a cut line across the card, slightly above center.  To set it up for cutting, I placed the title back inside the offset and cut this in five different colors.  I also cut the party "confetti" with each color.

As you can see from the picture I slightly offset each panel by about 1/16".  I trimmed top and bottom of each piece to allow a 1/4" space to allow the card base to show.   The Birthday was also layered which looks really cool from the side as you can see all the colors.


I then placed the layers for the candle on top and the various pieces of the confetti and made them all sparkle and shine with various products.


I cut the happy and attached it at the top of the card...with more sparkle and shine.


Taking my cues from the title, I created the sentiment for inside the card and used the balloon which is included with the cut file.  I also created lines the same colors as the layers on the front.
 

I enlarged the candle and confetti and placed them on the front of a dollar store gift bag and added still more sparkle and shine.


Then I shrunk the card front cut file to make this adorable tag.  I printed the birthday on the white card stock rather than cut it as it was too small to cut.   I punched a small circle on the side and ran some Bakers Twine through it.  I think this is my favorite of the three pieces…I love miniatures.


And here's the set all together.  Ready for the next birthday celebration.

I hope you liked my project.  I'll be back again next month with another.  In the meantime, I'd love it if you came to visit me at Katydid Cards and said, "hello".


Friday, September 23, 2016

Guest Designer - Roberta Stevenson

Surprise everybody!!!
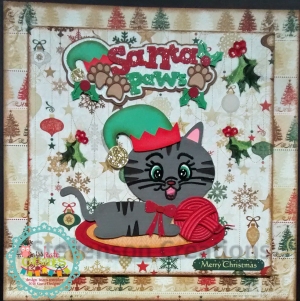
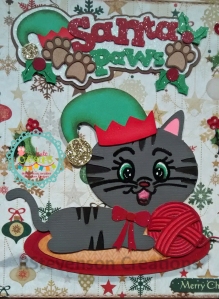
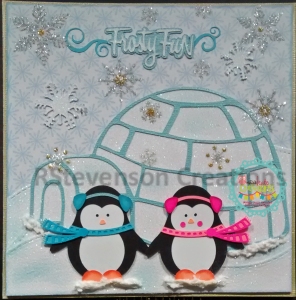
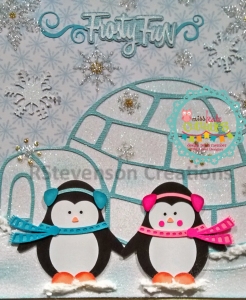
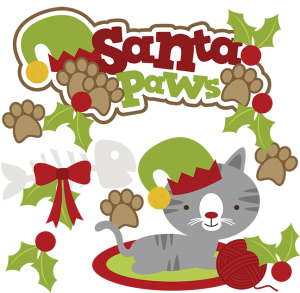
I am a guest designer for today on Miss Kate Cuttables. I was so happy when I discovered her site a few years back. I check back everyday to see what the new Freebie file is and I use her cuts a lot in my cards. When I found out that I was being offered a guest spot on her site, I was SUPER excited. I love doing all kinds of crafts and especially cardmaking. I make a lot of Birthday and Christmas cards every year. For today, I decided to showcase some Christmas cards I made using these 2 files from Miss Kate Cuttables. (Santa Paws and Frosty Fun). For the first card I used the files which can be found HERE.   

santapaws-full-mkcbadge
Here is a closer look.
santapaws-mkcbadge

I cut out the images using my Cricut Explore and Cricut Design Space. Then used my Xyron to assemble the pieces easier. After assembling the items, I used Clear Wink of Stella on "Santa", the holly and the bow. On the leaves, I used Wink of Stella - Green 040. For the face on the cat, I used Peachy Keen Stamps - PK110 Here Kitty Kitty Face Assortment. Used StazOn - Jet Black ink and Ranger - Clear Super Fine Detail embossing powder. Brightened up the eyes using Gelly Roll Sakura #8 Pen. Adding a touch of pink, green and red markers to accentuate the eyes and mouth. Patterned paper is from Bo Bunny - Silver and Gold Collection Paper - 6 x 6 in pad. Square stitched backgrounds is cut out using My Creative Time -Stitched Squares Inside and Out. Went around paper background edges with Tim Holtz Distress Ink - Vintage Photo. For my next card, I used the files from "Frosty Fun" which can be found HERE.


frostyfun-mkcbadge

Here is a closer look.
 
frostyfun-cu-mkcbadge

Used Sharpie - Gold Medium Point - Water Based Paint to go around the edge of the card. Recollections Christmas Ink Jet Printable Glitter Paper for the snow scene and igloo. Aleene's Glitter Snow below the feet and igloo. Extra snowflakes from Holiday Time - Snowflake Stickers - Forever in Time. Background paper - Recollections - Blue Christmas - 6 x 6 in. paper pad. Edging - Tim Holtz Distress Inks - Tumbled Glass. Below are the files that I used. 
 
Santa Paws SVG cat clipart cat svg cute cat clip art christmas svg Frosty Fun SVG cutting files snow svg files winter svg cut files penguin svg files cute clipart 


Hope you like them! Miss Kate Cuttables, thanks again so much for allowing me to be a Guest Designer on your site today. I enjoyed making the cards and had fun using the files.          

Thursday, September 22, 2016

'Tis the Season To Be Spooky

Hi Everybody! 
I'm so excited to share another Miss Kate Cuttables project with you! First I want to make sure you grab the freebie of the day:


Now, onto today's project! Here is the file I used:


Every year for Halloween, my kids and I create a graveyard in our front yard.  It's become a super fun family tradition, and I love seeing how as the kids get older the different things they come up with for decorations!

 
*The digital papers from the Halloween Night Paper were so perfect for this layout!  I used the Spiderweb paper for the background.  Then I added the different colored polka dot papers in this pack for the photo mats.

*For the title, I used the 'Tis the Season to be Spooky as a JPEG file (that has the white background included) to help it stand out against the background.  I used my photo editing software to soften the edges.

I hope you enjoyed my project! I'd love to see some of you try one of these and share it on the Miss Kate Cuttables Facebook page HERE, or on my Facebook page HERE. TFL, and hope everyone has a chance to craft today :)


Wednesday, September 21, 2016

Writer's Eye Posters

Hi, Miss Kate fans!  Thank you for joining me for my project today.  Before I share - remember to go grab your Freebie of the Day -  http://www.misskatecuttables.com/products/freebie-of-the-day/


For my project today I made some posters for one of the 1st grade classrooms I work in as a Paraprofessional.  We are working on learning sentence structure and rules.  They are simple but cute - I think the kids will like them and I hope they helps them learn.  :)


I used several MKD files - Bee, My New GlassesPlayground, Bowl of Ice Cream,

Worm in Apple, Boy in Pool Tube, and Girl in Pool Tube.

I hope you enjoyed my project and that you will come back often to see all the projects from our wonderful design team!

Monday, September 19, 2016

Autumn Girl

Hello are y'all getting ready for some nice fall weather, well I am. Debbie here from DD's Crafts Blog for my post today I have a cute litte Autumn girl, I had got over a few wks ago I believe when she was free over at the Miss Kate Cuttables store  yes free I said, so each day Miss Kate has a freebie up in the store for you, so be sure to visit when you leave here and grab your today's freebie.

Now onto my project for today well I have created a cute little Autumn card using this super cute Autumn girl. Here is a pic of the file I have used.


I just think she is so cute.

Now here is my card I have created using this cute little file


Autumn Girl
I hope you have enjoyed my post for today, if you would like more details on this please head over to my blog here @ DD's Crafts

Thanks again, 


Friday, September 16, 2016

Guest Designer - Rebecca Altamirano

Hi 
This is Rebecca from RebeccaAnnDesigns and today I am a Guest Designer for Miss Kate Cuttables. I just love Miss Kate Cuttables and use them a lot. My project is a Birthday Layout. I used the Happy Birthday title with a birthday cake and some balloons. I also used some retired Close To My Heart Paper called Zoe. I love the way it turned out.
. rebeccaaltamirano1   

Here are some close ups of the Birthday Title and the Birthday Cake.
 
 rebecca2

 rebecca3   

Thank you for stopping by, Come join me on Facebook and Pinterest! 
Happy Stampin' and Scrapin' Rebecca