Thursday, February 28, 2019

February Fan Projects

It's time to share all the amazing February Fan Projects!

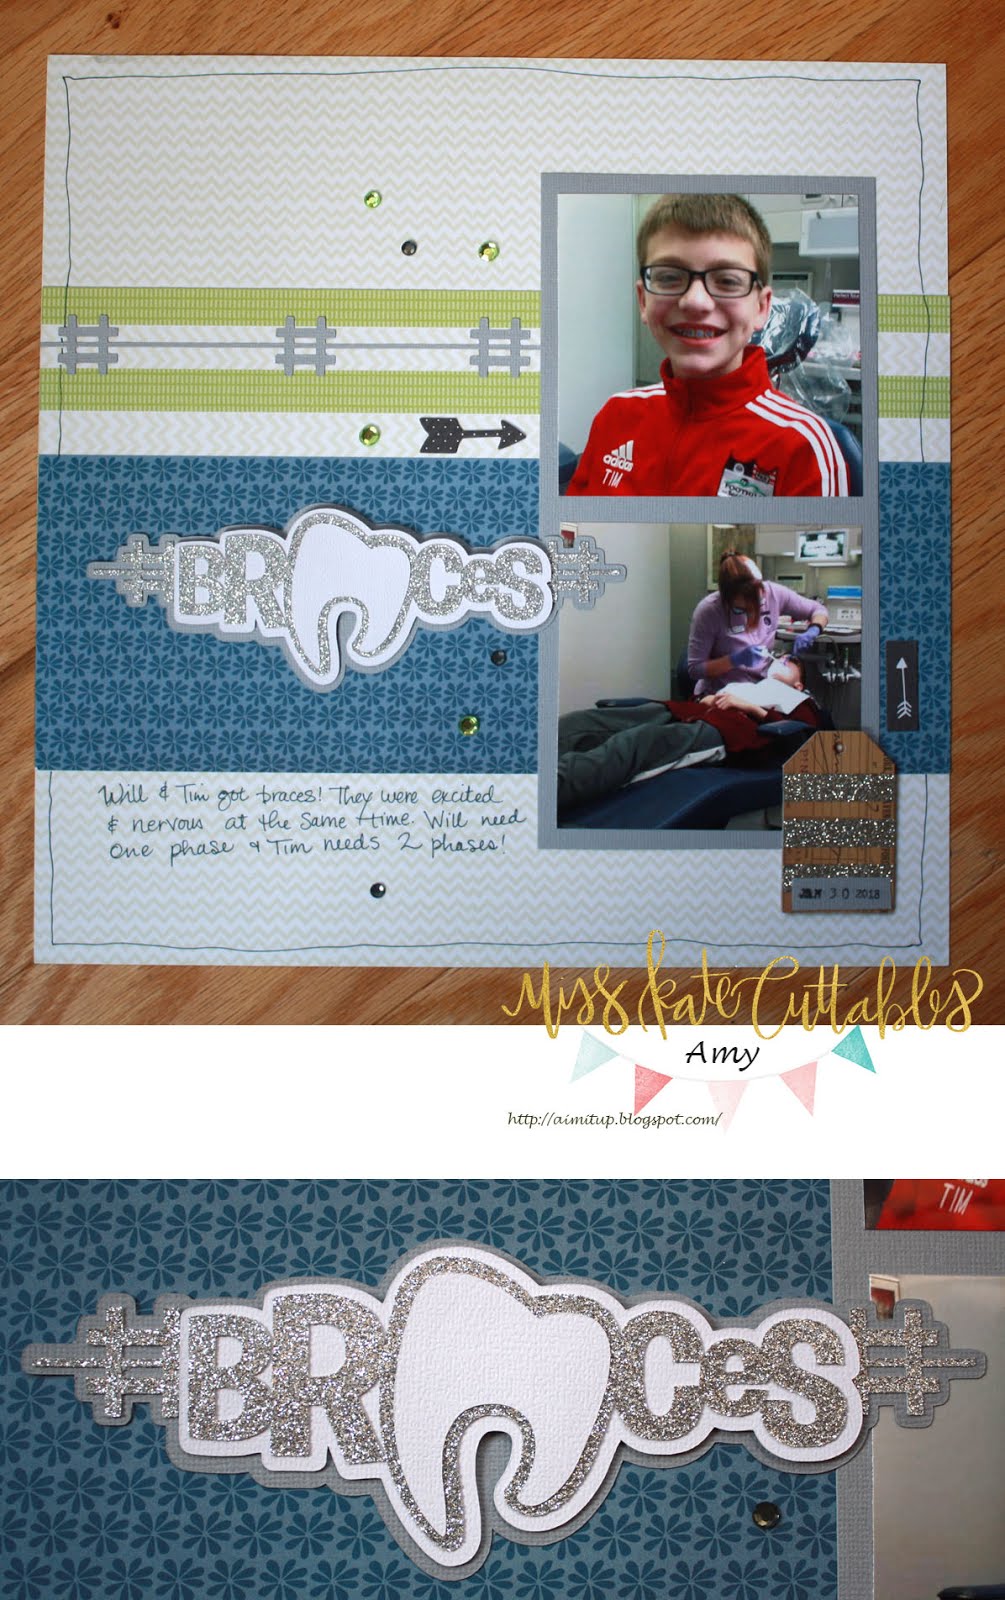
First up is a layout by Amy Prather-Smith

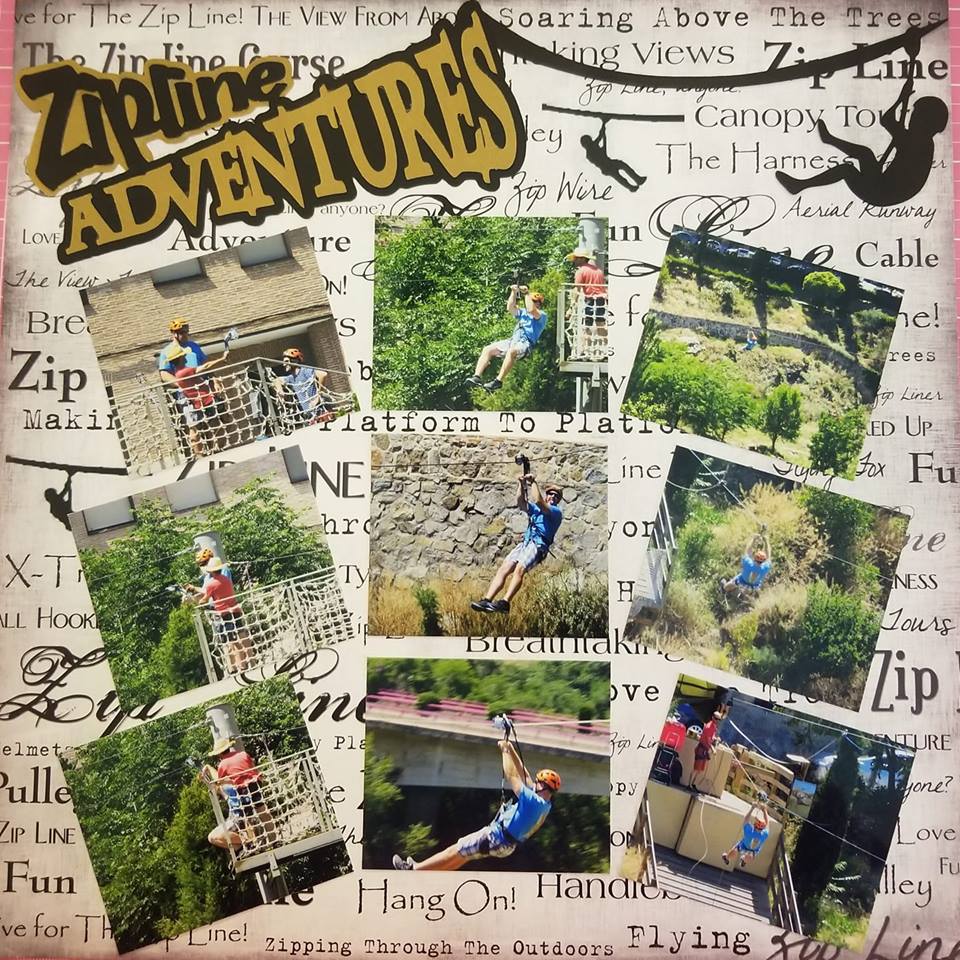
Here's a layout by Michele Roberts
   

Party Decor by Cindy Rufino

3D items by Linda Adkins

Cards by Sonja Bakonyi

Card by Michele Roberts

Here are a few projects from the Mardi Gras Challenge:
Card by Diane Paulina

Layout by Michele Roberts

Thanks for everyone who shared their creations on the Galleria Facebook Page!


Monday, February 25, 2019

Bee Happy

Hello Everyone!
Today is my day to show off on the
Miss Kate Cuttables Blog :)

First off...

As you know, Miss Kate Cuttables has the 
best darn SVG files and you can 
get one for FREE everyday!
YES...FREE!!!

Go HERE for today's FREEBIE.

Ok...now let's get down to business...
Check out this adorable and easy peasy 
card I made using the "Bee Happy Title" file


I just LOVE this Bee and his great big eyeballs!

If you're curious, all of the details on this 
are over on my blog HERE

I hope you enjoyed my card today...I would 
love it if you would leave me a comment and tell me what you think!

Please go visit me at 
Simply Silhouette and follow my blog :)


Friday, February 22, 2019

Guest Designer Tisha Van Dyke


Hello Fellow Crafters! 
 Today is my day to show you what I made with this adorable SVG from Miss Kate Cuttables, She has an array of fun images, papers and other crafty goodness. There are so many fantastic and cute SVG's and it was very hard to choose just one but I knew when I saw these images, I had to make this Layout  


I used this paper
IMG_E5317 
 to tell the story our scrapbook weekend getaway. My Cousin Gina, Aunt Jane and I had lots of fun scrapbooking together, eating yummy food and just relaxing while being crafty.
 I was able to use a project life 4x6 ruled journaling card that I hid on the second page of the layout as well as some various 6x6 DCWV paper pads to cut out the SVG images. 
 This title was super easy to put together and I debated on whether I should cut it out individually on my Cricut Maker or print and cut it out. I'm glad I chose the latter. It made the page come alive. I also loved the images that came along with this file.
 Now that some of Miss Kate Cuttables images are on Cricut Design Space, I am looking forward to using more of her designs in my projects. 
Please visit her blog to get more inspiration from her amazing SVG files, papers and more. 
Please be sure to click on all the links I used if you want to know more about these files or the items I used and visit my blog to see some more projects I have made with Miss Kate Cuttables files. 
 Thanks for stopping by! 
 Have a Scrappy Day! Tisha Van Dyke

Thursday, February 21, 2019

Jen's Crafty Place with a Vinyl Wine Glass Project

Happy New Year!! This is Jenny from Jen's Crafty Place with my first post of the year for Miss Kate Cuttables.

Today I am doing a vinyl project for Miss Kate Cuttables. I want to remind you to head over to Miss Kate Cuttables for a daily FREEBIE!!

 
I did a adorable "love" saying with vinyl. It is layered but EASY to do. I had 2 shades of blue so I did the heart in blue. You can choose any colors or just do it with one layer of red. I purchased the file called "Word Love Set" from Miss Kate Cuttables. This idea can be done with just about any word set so look around and find one you like. (My directions will be for the love file but the idea is the same for all.) Open up your favorite cutting program. I used the Silhouette program to cut it with my Cameo 3.


As you can see above I took the layers apart and placed them on my mat in three places. Each item is a different color. This way I can cut them all with one pass through the cutter. I placed a piece of black vinyl at the top left large enough to fit the image "love". I then placed the two layers of the heart in the top right and bottom right of my mat, just like in the image above. I set my cutting tool to "vinyl glossy" since my vinyl is glossy and then hit "send". The machine cut them out beautifully. (I also want to mention I placed squares around each of my images for easier weeding.)


After I cut the items out I weeded them (weeding means to remove all the extra vinyl you aren't going to use for the project.) Then take some transfer tape and lift off the darker heart. Place it over the black heart space on the word "love" and adhere. Next, lift off the lighter heart and place it over the darker heart. This makes it easier to place it on the curved surface if all your layers are already on the project.


Lastly, make sure your item is clean (if using glass, use some alcohol to wipe the area down to remove any finger prints, oil from your hands or any dust) and lift the whole design with your transfer tape and adhere to your final project. Make sure you rub the vinyl down to get good adhesion. For a bonus, the tiny heart that was cut out of the larger heart, I place it at the end of my "e" for a little pop of color at the end. That's it! Project done and ready to use!!


I hope you enjoyed today's project! Make sure you stop by my blog and up for my newsletter so you don't miss any upcoming projects!

Sunday, February 17, 2019

Bowling, Braces & Burritos!

Hello There! It's Amy and I'm sharing a few single page layouts I created at a recent scrapbook weekend away.

Don't forget to grab the Freebie of the Day!

First up is Bowling:


I used the Let's Bowl Title.

Next up is my Braces Layout:


I used the Braces Title for my layout and cut out of silver glitter paper.
I used the top layer about the title on my page.

Last but not least here's my Burritos Layout :)


I used the following SVGs on my page:

Hope you liked my single page layouts!

Saturday, February 9, 2019

Love Birds

Happy Saturday everyone!  It's Sherri from The Squeaky Scrapper with today's inspiration post.  

Don't forget to grab your freebie of the day Here!
~~~~~~~~~~~~~~~~~~~~~~~~~~~~~~~~~~~~~~~~~~~~~~~~~
Today's post is a Valentine's Day card with the two latest love bird files that were released in the store.  I just LOVE these two files, and hope you do too!  


Stop on over to my blog and say hi ~ The Squeaky Scrapper.

Friday, February 8, 2019

Guest DT Angela Corcoran


Hi everyone! 

Today I get to be a guest designer for Miss Kate Cuttables. I just love their files and how easy they are to work with! 

I made my hunny a Valentines Day card using 2 of their files - 

I used the print and cut feature for the frogs on this card. Some pop dots were used on the back of the frog, and the blue offset background. Then I added an action wobble on the back of each of them....just love those things! Jaded Blossom always comes to the rescue for my stamps! I used Valentine Signs for the sentiment which is added to their yard sign from the Fall Dies set. And inked with Close to my Heart outdoor denim & black. 


Take a peek at the video to see the froggies in action! 

Thanks for looking and Happy Valentines Day! 

Friday, February 1, 2019

Bee Mine

Hello Miss Kate Cuttable Followers
Today is my day to post a project 
Now before you dive in make sure you 
get over to MKC site to grab 
your Freebie {HERE}
Can't you believe it almost Valentine's Day!
Create this cute "Bee Mine" Card
This is one of the new release!
DOTD Bee Mine 01/14/2019 - DOTD190114BeeMine - Miss Kate Cuttables - New Releases!
I wanted to Challenge myself and use 
the whole set of images.  
All the images where printed and cut
 using  the Brother Cut&Scan2 
Just Print and Cut! 
Wanted the girl Bee and Boy Bee to pop
So I added an extra layer mounting tape 
It help to give your images a layer look.
Love the honeycomb paper it just  make 
the whole card !

Make sure you follow us and Join us for
Monthly Challenges we host on the 
Facebook Galleria Page.
Make sure you also check out 
my personal blog